Thursday, October 18, 2012

Cake Pops


Cake pops are a fun treat for any occasion. I recently made these for my niece's birthday party! All of the kids loved running around with them. It's cake on a stick--how perfect is that!

Ingredients:
-Your favorite cake recipe
-2 tbsp. of your favorite icing
-Cake pop sticks--can be purchased at crafts stores like Michaels
-Wilton's Candy Melts
-Sprinkles

Directions:

1) Bake your favorite cake recipe and let it cool.
2) Crumble the cake into a medium size bowl.
3) Add 2 tbsp. of your favorite white icing and mix into the cake to form a cohesive mixture.
4) Roll the cake into small balls and place on a cookie sheet.
5) Place cookie sheet into the freezer for 20 minutes to let the cake balls harden.
6) Melt Wilton's Candy Melts and partially dip the sticks into the melted candy.
7) Place the stick into the frozen cake balls and let the candy harden for 10 minutes.
8) Once all of the sticks are placed into the cake balls, you may need to reheat the candy melts before your dip the cake into the melt.
9) Before the candy hardens, sprinkle it with sprinkles!


Here are some great ideas I love for the upcoming Holidays:


 Have fun with Cake Pops!

Friday, July 20, 2012

China Cabinet, Not Just For Dishes

With all our cooking gadgets filling up our kitchen cabinets, Emerich and I needed some extra space for some of our china. But we also decided to let it be a place to really showcase who we are! I love pieces of furniture that tell a story about a trip somewhere interesting or a memory. This is still a work in progress, but we are starting to fill it with things that really represent us like our favorite cook books, pictures and trinkets. But I did tell Emerich, no law books :)


By adding pictures and memorabilia, you are able to really keep the cabinet interesting.


Pantry Storage

Have a small pantry with lots of clutter? Need something to help you organize all your tasty treats? Check out what I've done.


Such an easy solution to a cluttered cabinet!


The containers can be found at amazon.com and shops like Bed Bath & Beyond. The brand is called "OXO containers".


These labels are so fun to make and have around the house. First, you want to buy chalkboard paper with a sticky back (can be found at craft stores like Michaels). Then buy a large cutter in a shape that you like (also can be found at craft stores like Michaels).

Tuesday, July 17, 2012

A Dresser Makeover


While searching for an antique dresser to go with the laid-back style of our bedroom, I was disappointed at the selection. We went to every antique store, flea market and resale shop and could not find anything! After a while, I decided that I was going to just find a dresser and refinish it myself, but that search didn't go well either. So I opted for an experiment and was really glad that I did!

Below are the steps on how to make a "Weathered Wood Finish" or a "Faux Barnwood" look. This entire project was a blast, but there were a few things that really made it for me:

1) Incredibly inexpensive--total cost was under $60!
2) Really fun afternoon project--especially adding the dents and dings with the hammer and chain
3) Finding some unique door pulls to add your personal style


What you will need:

* Raw Wood Dresser (or any sanded wood piece--you could even make a table or bookcase!)
          - I found mine at Ikea for $34.99
* White Wood Stain (Water-based works best because it dries quickly and is has almost no odor)
          - I used MINWAX Water-Based Wood Stain in White Oak
* A Flat Gray Paint (any color or brand will do--pick a shade of gray that you like)
*Foam Brushes (2)
          - You may also use a bristle brush, but foam works too
*Hammer, Metal Findings, etc. to rough it up a little bit

Step One: Staining the Wood
Make sure your stain is well-stirred before using. Stain the wood using a foam brush. Using your wood stainer apply a thick coat and let it dry. Do not wipe of any of the residue (sometimes the staining can will tell you to do so, but just leave it). This is the base coat for your wood so make sure you like the color of the stain that you chose.


Step Two: Adding the "Weathering"
After the staining has dried (usually about 10 minutes, if you are outside), dab the edge of a clean foam brush into the well-stirred flat gray paint. Brush it sparingly on the already stained wood. Let it dry. See video below.

Video:


Step Three: Rough it Up
This is where it really gets fun! Grab a hammer, some old biscuit cutters, a metal chain, etc. and rough up that wood! It'll soften it up and give it some character (especially if your wood is new). I like to hammer down the edges of the wood to give it a smoother finish--just an idea!


Step Four: Add Some Knobs
I purchased these from Anthropologie and they were on sale for $2.95--love a sale! But you can use any pulls you like :)


Questions? Please feel free to contact me!


Monday, June 11, 2012

Breakfast With Superheroes

One of my favorite things to do when I'm in Baton Rouge is to go to Coffee Call with my nephews. We eat beignet fingers, drink OJ and consume about 3 cups of powdered sugar (half of which ends up on the floor and in our hair, on our clothes...etc). I have been going to Coffee Call since I was little and it's so great now to take my nephews and experience it with them.

They are ready to protect and serve.

My Visit to Baton Rouge

Last weekend I flew down to Baton Rouge to visit family before my friend's beautiful wedding in New Orleans. I played with my nephews, got decorating inspiration from my sisters gorgeous house and ate some amazing food.

Grant & Snoopy

Walker After His Swimmeet 

Liz's Gorgeous House


Love these containers she bought at Hobby Lobby to put hair ties and accessories in.


Liz's Panel Paintings...Gorgeous 


Loved this painting so much that Liz gave it to us for a wedding gift--yay!


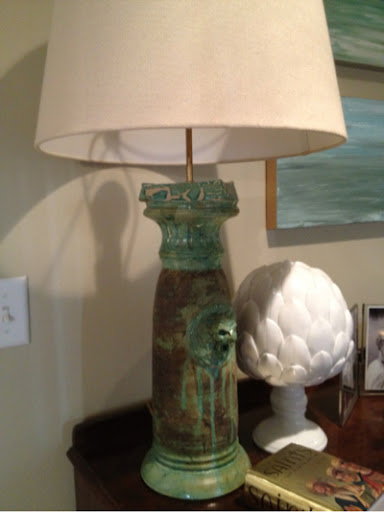
How great is this lamp?


This is a great way to display pictures and cool nick-nacks.


Gorgeous shelves in the guest room. 


Saturday, June 9, 2012

Rustic End Table


 I know I mentioned Randolph Street Market a few posts ago, but this is the end table Emerich and I picked out for my big 1/4 of a century Birthday gift!

You know you're getting old when you pick furniture for your birthday presents...

This end table is made from salvaged railroad pieces and reclaimed wood. Love. 

Right now it's hanging out in Emerich's Man Cave, but as soon as the furniture is delivered and we have a rug, it's moving-on-up to the grownup living room!


Can't wait to see what we find next time!